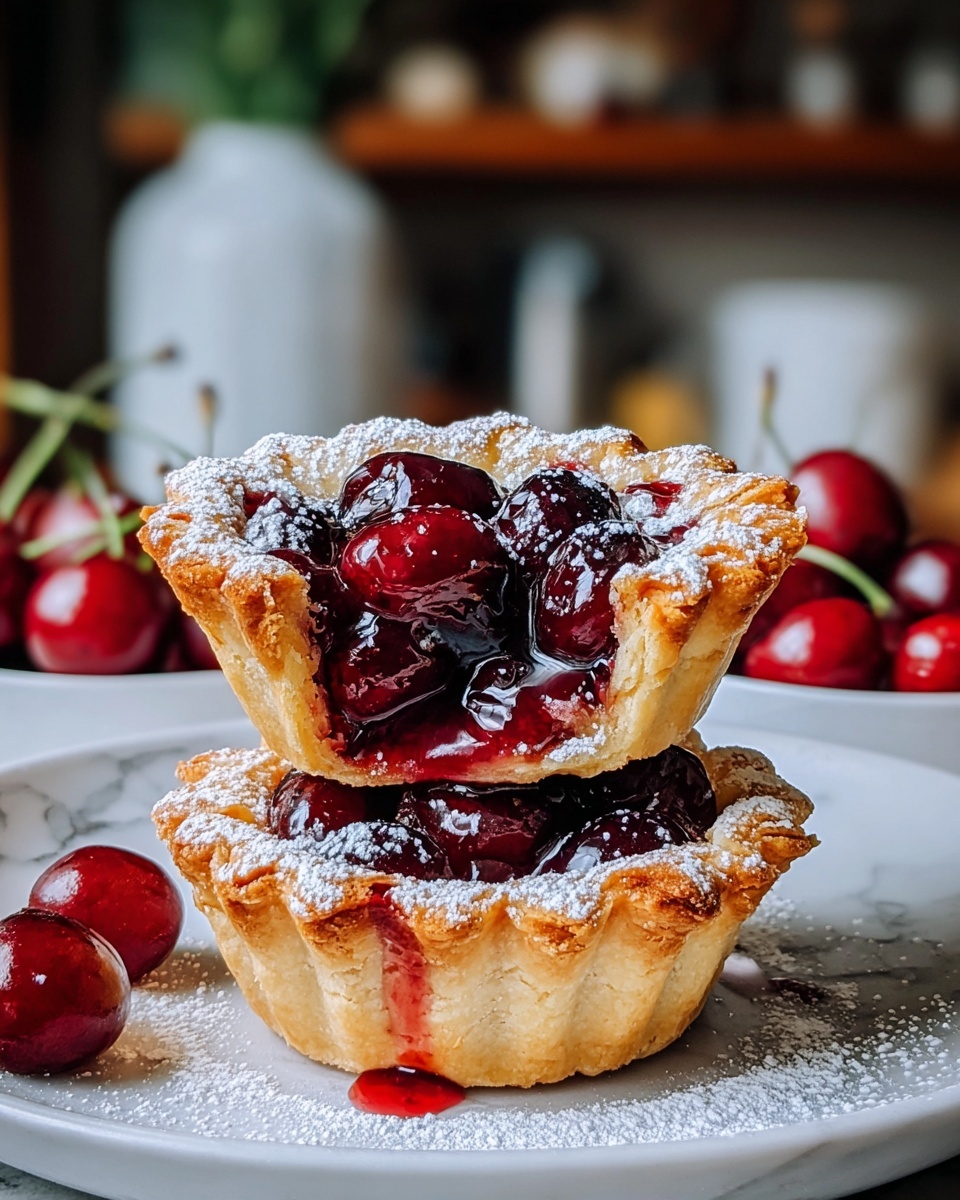
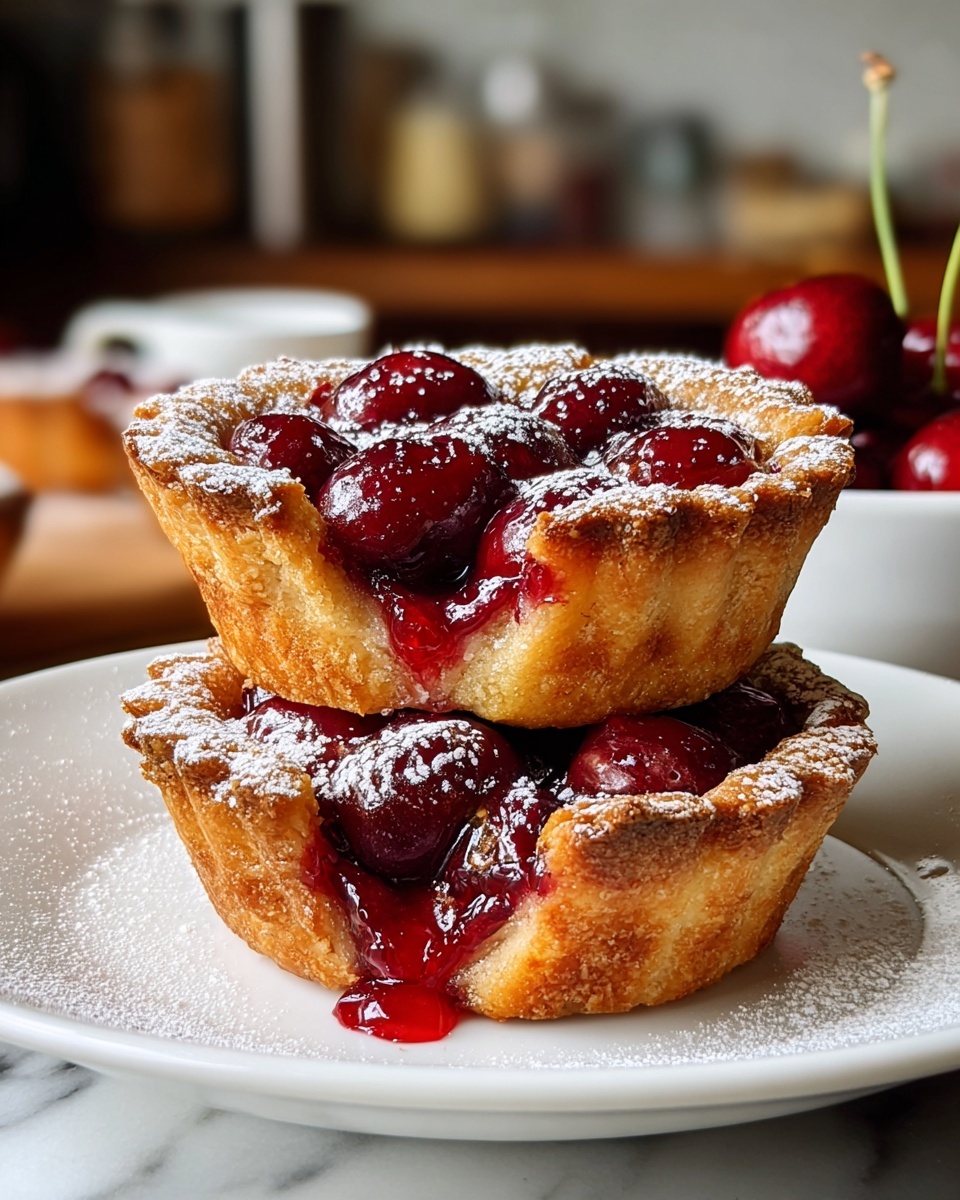
If you’re looking for a delightful treat that combines the burst of fresh fruit with the flaky goodness of homemade pastry, this Mini Cherry Pies Recipe is going to become your new favorite. These charming little pies are perfectly portioned and packed with juicy cherries that burst with every bite. They’re not just adorable but incredibly satisfying, balancing sweetness and tartness with a tender crust that crisps just right in your oven. Whether you’re baking for a cozy family dessert or a party, these mini cherry pies bring warmth and joy to any table.
Ingredients You’ll Need
Gathering simple, high-quality ingredients is key to making these Mini Cherry Pies shine. Each element plays a crucial role in creating the texture, flavor, and gorgeous appearance that makes these pies irresistible.
- 2 cups fresh cherries (pitted and halved): The star of the show that provides natural sweetness and vibrant color.
- 1/2 cup granulated sugar: Enhances the cherries’ natural tartness with just the right amount of sweetness.
- 2 tbsp cornstarch: A thickening agent that ensures the cherry filling stays luscious and doesn’t get runny.
- 1 tbsp lemon juice: Adds brightness and balances flavors with a subtle tang.
- 1 package (14 oz) pie crust (store-bought or homemade): Provides that flaky, buttery base and top that’s essential to a great pie.
- 1 egg (for egg wash): Gives the crust a gorgeous golden sheen and helps seal your pies.
How to Make Mini Cherry Pies Recipe
Step 1: Preheat and Prepare the Cherry Filling
Start by preheating your oven to 375°F (190°C), which is the perfect temperature for baking these petite pies evenly to a golden brown. Meanwhile, toss your pitted and halved cherries with sugar, cornstarch, and lemon juice in a bowl. Letting this mixture rest for about 10 minutes allows the sugar to dissolve and the cornstarch to begin thickening the wonderful cherry juices.
Step 2: Roll Out and Cut the Pie Crust
On a lightly floured surface, roll out your chilled pie crust to about 1/8 inch thickness. This thin crust is key to keeping the pies light and flaky without overwhelming the filling. Use a 4-inch cutter or a simple round object to cut out circles from your dough—these will become your individual pie shells and lids.
Step 3: Assemble the Mini Pies
Place each dough circle into a greased muffin tin cup, gently pressing it down to form the base. Spoon about one tablespoon of the cherry filling into each cup, careful not to overfill. Then place another dough circle on top, sealing the edges by crimping them together. This keeps in the juicy filling and gives your pies a beautiful edge.
Step 4: Egg Wash and Vent the Pies
Brush the tops with beaten egg to create a shiny, golden finish. Use a small knife to cut a few slits in the top crust to let steam escape during baking—this helps prevent sogginess and keeps the filling bubbling inside beautifully.
Step 5: Bake Until Golden and Bubbly
Pop your muffin tin into the oven and bake for 20-25 minutes. When the pies turn a rich golden brown and the cherry filling bubbles up through the vents, they’re ready. Let them cool slightly before serving to enjoy that perfect balance of warm filling and crisp crust.
How to Serve Mini Cherry Pies Recipe

Garnishes
Serving these mini cherry pies with a simple garnish can take them from delightful to unforgettable. A dollop of freshly whipped cream or a scoop of vanilla ice cream is a classic way to complement the warm, fruity filling. You can also sprinkle a few toasted almond slivers or a light dusting of powdered sugar on top for added elegance and texture.
Side Dishes
Because these pies are sweet and rich, pairing them with lighter side dishes creates a harmonious meal. Fresh fruit salads, crisp green salads with citrus vinaigrette, or even a refreshing mint tea provide a lovely balance. If you’re feeling indulgent, a creamy cheese plate can also accentuate the tart cherry flavors beautifully.
Creative Ways to Present
Mini cherry pies make a visual feast, so presentation matters. Arrange them on a rustic wooden board, interspersed with fresh cherry stems and sprigs of mint, for a charming, rustic vibe. For a party, serve them in pretty paper liners or on tiered cake stands to add height and drama. Wrapping each pie with a tiny ribbon adds a personal touch perfect for gifting or special occasions.
Make Ahead and Storage
Storing Leftovers
If you have any leftover mini cherry pies, store them in an airtight container at room temperature for up to two days. Keeping them out of the fridge preserves the flaky texture of the crust, but if you live in a warmer climate, refrigeration is safer and the pies will last for up to four days.
Freezing
Mini cherry pies freeze wonderfully, making them a perfect make-ahead dessert. After they have cooled completely, wrap each pie individually in plastic wrap and then place them in a freezer-safe container or bag. They’ll keep for up to two months, ready to thaw and reheat when you want a sweet treat.
Reheating
To bring back that freshly baked taste, reheat your mini cherry pies in an oven preheated to 350°F (175°C) for about 10-15 minutes. Avoid the microwave if possible, as it can turn the crust soggy. A quick warm-up in the oven crisps the crust back up and heats the filling to just the right temperature.
FAQs
Can I use frozen cherries instead of fresh?
Absolutely! Frozen cherries work well in this Mini Cherry Pies Recipe. Just be sure to thaw and drain them to remove excess liquid, which can make the filling watery.
Is it possible to make these pies gluten-free?
Yes! Simply substitute the regular pie crust with a gluten-free version available at many stores or make your own. The filling remains the same and tastes just as amazing.
How long do these mini pies take to bake?
They typically bake for 20 to 25 minutes at 375°F (190°C) until the crust turns golden brown and the filling bubbles.
Can I add other fruits to the filling?
Definitely! Mixing in blueberries or raspberries with the cherries creates a delicious flavor twist. Just adjust sugar and cornstarch amounts slightly if needed.
What is the best way to prevent the bottom crust from getting soggy?
Using a muffin tin helps keep the crust firm and well-supported. Also, rolling the dough thin and making sure the filling isn’t too wet help prevent sogginess.
Final Thoughts
There is something truly magical about these Mini Cherry Pies Recipe—every bite feels like a celebration of summer fruit wrapped in buttery, flaky crust. Whether you’re an experienced baker or trying your hand at pies for the first time, these minis are approachable, fun, and utterly delicious. Give this recipe a try and watch how it brightens up your kitchen and your day!
Print
Mini Cherry Pies Recipe
- Prep Time: 15 minutes
- Cook Time: 25 minutes
- Total Time: 40 minutes
- Yield: 12 mini pies
- Category: Dessert
- Method: Baking
- Cuisine: American
Description
These Mini Cherry Pies are delightful handheld desserts perfect for any occasion. Bursting with juicy cherries and a sweet, tangy filling, these pies have a flaky golden crust and are baked to perfection. Ideal for serving at gatherings or enjoying as a treat, they combine simplicity and classic flavors in every bite.
Ingredients
Filling
- 2 cups fresh cherries (pitted and halved)
- 1/2 cup granulated sugar
- 2 tbsp cornstarch
- 1 tbsp lemon juice
Crust
- 1 package (14 oz) pie crust (store-bought or homemade)
Egg Wash
- 1 egg (for egg wash)
Instructions
- Preheat Oven: Preheat your oven to 375°F (190°C) to ensure it is hot and ready for baking the pies.
- Prepare Filling: In a bowl, combine the halved cherries, granulated sugar, cornstarch, and lemon juice. Let the mixture sit for 10 minutes to allow the flavors to meld and the cornstarch to begin thickening the juice.
- Roll Out Dough: On a floured surface, roll out the chilled pie crust to approximately 1/8 inch thick. Use a round cutter about 4 inches in diameter to cut out dough circles for the pie bases and tops.
- Assemble Pies: Place one dough circle into each cup of a muffin tin. Spoon about 1 tablespoon of the cherry mixture into each dough-lined cup. Top each with another dough circle and crimp the edges firmly to seal the pies.
- Apply Egg Wash: Brush the tops of the pies with the beaten egg to give them a beautiful golden sheen once baked. Cut small slits in the top crust to allow steam to escape during baking.
- Bake: Bake the mini pies in the preheated oven for 20-25 minutes until the crust is golden brown and the filling is bubbly.
Notes
- Use fresh cherries for the best flavor, but frozen cherries can be substituted if thawed well and drained.
- Chilling the dough before rolling out helps prevent sticking and makes handling easier.
- Ensure to crimp the edges well to prevent filling leakage during baking.
- Allow pies to cool slightly before serving to let the filling set.
- Egg wash helps achieve a shiny, golden crust but can be omitted for a dairy/egg-free alternative.


